Feeds:
Posts
Comments

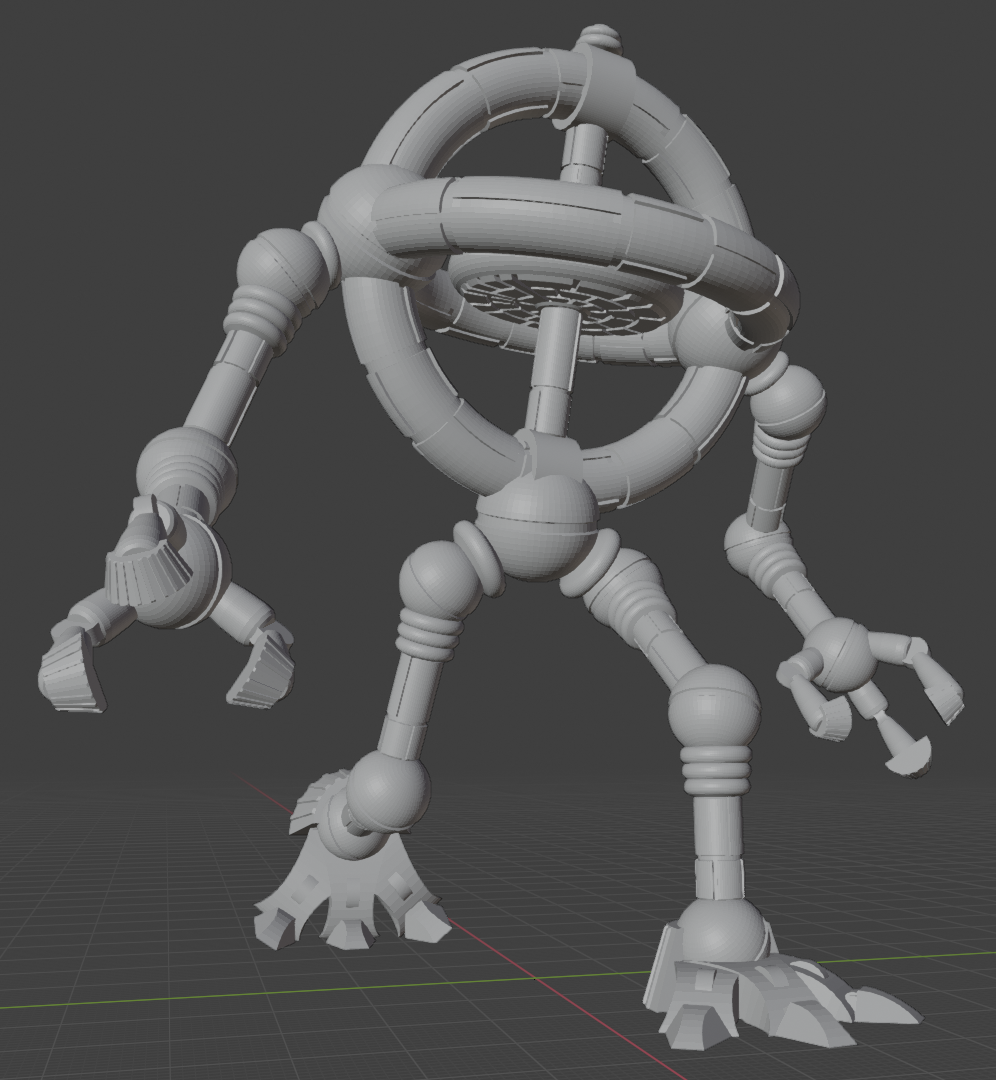
Warmachine is a tabletop wargame that I’ve had my eye on for almost 20 years. I purchased some of the rulebooks and pored over them, thinking that maybe some day, I’d dive in and get some models, paint them up, and play a few rounds. The steampunk-magic craziness is a theme that is near and dear to my interests, and the small squad play is far more interesting to me than fielding a Warhammer army of dozens. I’ve always loved tactical games like Final Fantasy Tactics and Tactics Ogre, and the gridless system of Warmachine seemed fascinating. (Behemoth model photo below shamelessly swiped from eBay for reference.)

Privateer Press has relatively recently announced that they are moving to a “Mark IV” for their game, which is jettisoning their previous design ethos of always allowing any produced models to be played. They are making a whole new range of minis and moving their fictional world ahead in time some decades or so. This has pros and cons, which I’m not really going to dive into here, since I’m still mostly an outsider, but suffice it to say that it’s causing some friction. On the upside for me, Privateer Press has put most of their models on sale, and it’s a great time to pick up deals on Facebook or eBay as people sell off their collections.

Sure, these deals that I’m picking up are the old “legacy” models, so I won’t be able to go to tournaments or the like with them, but I intend to play with my kids and maybe a friend or two here and there, so I don’t really care what the cutting edge of the game is doing as far as what I’d need to play there. As such, I can get small battle groups from just about every faction and have a ton of play options. Yes, I’m cheap, and way behind the adoption curve, but that’s just how I do most things.

Also, I’m going to be “proxying” several things, making my own minis to use in the game. I’m using this “abandoned wild west” of the game as my playground for testing out small scale sculpting and painting. I’ve wanted to do this sort of thing for decades. I work digitally professionally, and it’s great to have tangible work as part of my skillset. That’s part of why I ran the Tinker Kickstarter campaigns, making physical goods of my designs (plenty of leftovers are still for sale over on my shop site!). There’s just something satisfying about real world art that my days full of digital work don’t quite match. I do love a lot of what I do in the digital world, it’s just not the same, especially as AI gets weirder, and I want to have more skills I can call on if needed. These proxies can also be useful when I play D&D with my kids and cousins, since that’s a thing we do here and there.

This project started in my sketchbook, of course, like so many other fun ideas.

I’ll be doing something for most of the factions in the game, but to start off, I’ll be digging into a faction from the complementary game, Hordes. (Warmachine and Hordes are designed to work together, and indeed, are rolled together under one banner for Mark IV. Warmachine is more about the tech side, Hordes is about monsters.) I’m taking the Hordes “Circle Orboros” faction and changing them up a bit. Instead of the standard “forest monsters” theme, I’m taking their “wold” stone monsters and reimagining them as a squad of beasties that protect their world’s equivalent of Goblin Valley. This means some custom units I’ll be sculpting and painting, and taking some of their units and painting them in a style that evokes that weird-but-beautiful red sandstone feeling so famous in the Utah deserts.

Tangentially, I have a bunch of my own photos of Goblin Valley that may be of interest over on Pinterest.

To get started, then, I’m sculpting my own Sentry Stone, themed around Arches national park and the iconic Delicate Arch and double arch. It’s a cousin of sorts to Goblin Valley, so it fits the theme well.

Here, then, are some of my process photos for my unit, meant to be a stone arch trio, on a 40mm round base. I started with a wooden base, lasercut by a friend of mine. I drilled some small holes and added some artfully mangled paper clips and a bit of superglue.

Then came the Sculpey polymer clay, carefully molded and detailed by finger and toothpick.

After the first baking pass, some sand and a Burnt Sienna wash…

…I decided that I didn’t like part of the interior of the large arch, and sculpted in an addition.

After the second bake and another thin coat of Burnt Sienna, it was time for some other light glazes in bands to get that sandstone layered look.

A bit more detailing, and I’m ready to call this done. The Circle “Blackclad” druids do tend to sculpt runes into their work, so I might revisit this with some runes at some point, but I’m undecided on the colors for that. I mostly want this to stand on its own visually, but the runes would help it look more consistent with the official models when I get to those.

This was a project I tried mostly to see if I could sculpt well enough, to test the Sculpey itself, the paints and the paint scheme, and the overall look and feel. It’s a bit more banded than the proper Goblin Valley bits will be as I proceed through the project, but overall, I’m very happy with how it turned out. I’ll put together some of the “mannikins” with toothpicks, string, superglue and some sort of thing for the leaves of the original. I’m using juniper and bristlecone pine trees for inspiration instead of deep forest oaks and such, so I may just do some pine needle sculpting or go scrounge up some actual tree bits for use on those. I do have some proper models from Privateer Press for this project later on, but I’m using these homebrew experiments to nail down my process before I go all in on the painting for those models.

I’m looking forward to doing more of this, and I hope that you enjoy the trip as well. Thanks for stopping by!

Authenticity and Artifice

AI Art was all the buzz a couple of weeks ago. That chatter has died off somewhat, perhaps as people got tired of the shiny new toys like Midjourney and Dall-E 2, but it’s a Thing that will only get more technically impressive and practically useful as time goes on. The pros and cons of that can certainly be debated, but I don’t think that we’re going to see that genie go back into the bottle. Like “Machine Learning”, which improves things that the Money Men care about in production, like schedule and headcount, using AI in art is a tool and a toy that is too useful to go away. At least, until the inevitable meltdown of society and technology, and we’re back to drawing on stone cave walls with charcoal-tipped sticks, but that’s tangential.

“steampunk floating island apocalypse” via NightCafe

This particular bit of buzz is of interest to me both in the abstract and professionally. I worked in video game development for a decade, and I’m working in film at the moment. I haven’t had occasion to use these particular tools for anything more intense than helping my kids with homework, but I do use Houdini, which is built on “proceduralism“, which is more or less the engine that drives AI art.

I’m already using a tool that takes inputs, runs simulations and variations, then spits out something that I can sort-of art direct. The computer does the heavy lifting of calculating all the bits and bobs bouncing about, and if I’ve set up the parameters for the procedure correctly, that calculation comes up with something usable. My job is then mostly about setting up the system for success, and inevitably wrangling things when the computer mangles them somehow. I’m not drawing and painting frames, like I grew up wanting to do, watching the Nine Old Men work their magic. No, I’m a desk-jockey cowboy-mage, desperately trying to harness eldritch powers in a digital wilderness, hoping to produce something that the art director will be happy with.

I’m using a tool to produce effects. It’s not the same as using a ballpoint pen on paper, which I can do, as seen here with my Dwarven Tinkerer, but it’s still a tool. It’s a tool with a bit of a mind of its own, and a black box heart that I hope I can channel to great effect. Sometimes it does as predicted, but sometimes it gets a bit flipped somewhere, or an assumption inverted, and things go awry. This, to me, is the most irksome part of using such tools from a production standpoint. Yes, the simulations get faster and faster every year, the results cleaner and more useful… but sometimes I just don’t have the control that I have with much less ambitious (and much more time consuming) tools.

Maybe I can have the spiffy AI system generate 200 different trees, all variations on a theme based on growth rules and parameters, but none of them are what I actually want to use for a “hero” tree. They can be good for fillers to back up the Potemkin Villages that games and films build as part of their magical facades, but for things that get the spotlight, that Uncanny Valley effect where computers still don’t quite get reality is still a hurdle.

We’ve known this for a long time in film; that’s part of why filmmakers can get away with matte painted backgrounds and greenscreen tricks, even as they spend an inordinate amount of time on actors and their makeup and lighting. Backgrounds can be simpler, counting on viewer assumptions and interpolations to gloss over imperfections. We also see a similar “audience interpretation” filling in the gaps when we look at concept art. Even masters like Daniel Dociu, for all their incredible skill and intricate detailing, still don’t work out and carefully render every little detail when they produce concept art. Zoom in on something like his “Tectonic Dystopia” piece…

…and note that even as he bombards the viewer with detail, it doesn’t always bear heavy scrutiny. He’s put in a lot of work, but a detail like a single road is largely a suggestion, a brushstroke or two, maybe a few blobs or smudges, and the viewer’s assumptions of what a city looks like at scale fills in the mental gaps. It’s a fine dance between just enough detail to be plausible without having so much detail that it triggers our sense of wrongness if something’s not perfect.

Leveraging the viewer’s imagination and interpretation is indeed part of Dociu’s mastery of his craft, and while I may sound disparaging, I recognize and am impressed by his genuine skill in performing such feats. Sometimes, we want to be fooled. Art movements and forms of entertainment have been built on this sort of shenanigan, tricking the viewer’s eye, like pointillism, impressionism, or the mental assault of cubism and lesser imitators in more modern art, bluffing with balderdash to give the impression of depth.

The principles at play, then, those of dazzling with detail, or overloading with obfuscation, well, those are age-old fine art traditions. When it comes to AI, though, it’s still learning. It’s only as good as the material it’s trained with, and the assumptions built into the generation systems. Those assumptions aren’t always built with fine art principles in mind, or are built to function first, rather than consider fripperies like composition, emotional appeal or verisimilitude, much less photoreality. Perhaps such considerations will continue to be folded into the frameworks of these tools, but for now, there is a lot of room to grow.

Deep Fake videos are one branch of the technology that is getting particularly interesting and potentially troublesome. Sure, being able to fake Tom Cruise or Harrison Ford is a humoresque parlor trick, but more nefarious uses abound in an era of political disarray and general lack of fidelity to truth. There’s a moral dimension to art, and there always has been, so it’s wise to be aware of how technology can engender trust when it is not warranted. Again, sometimes people want to be fooled, though, for better and worse.

Similarly, there are revolutions in animation brewing. Motion is especially tricky, and much more likely to faceplant into the Uncanny Valley. The technology keeps improving, however, as noted over here, and here. This will definitely make some production faster, especially for midground and background crowds and such. It will be interesting to see how well it fares in the foreground. I’m not convinced yet that it will work as well as some would like, but there are already real consequences for production pipelines.

In the meantime, however, I’ve found that I increasingly value authenticity. From OK GO‘s oddball music videos that bank on their intense efforts in production to Wintergatan’s fascinating machine, from anachronistically authentic YouTube gamers (the older gentleman known as TinFoilChef just played Minecraft the way he wanted to and built an audience that loved his affable curmudgeonly ways) to hand-carved woodworking, I find value in things that appear to me to be genuine and honest. I still carry pens and a sketchbook most places I go, after all, and I’m almost always drawing something, even if it’s just odd designs to keep myself focused. There is value in things that have been made by hand, though whether that value can translate into a career is certainly always a question.

The sky isn’t falling. New tools mean more ways to fool people, with all its attendant implications for an increasingly dysfunctional humanity. “All is vanity“, though, and we must always consider truth and our own decisions. It was ever thus. My profession is definitely impacted, and my personal interests in creative endeavors will be perturbed somewhat, so I’m not neutral on this. I simply see yet another set of shenanigans. Artists have always borne responsibility to be uplifting and useful, since their tools are inherently not honest, as mere representations of reality. Far too many fail miserably at this, and new tools will not compensate for moral failures. Those of us in the audience will always have to be wary, or at least, we’ll have to choose which artifice we want to accept as authentic.

OCD Mondrian Cube

The Rubik’s Cube was a Big Deal for a while when I was young. Nobody I knew understood how to solve it, but we liked trying, at least, until we got tired of failing. I think I managed to get the top layer solved, but never made much more progress, so I shelved the thing and moved on to more solvable puzzles like calculus.

Now that I’m older with children of my own, I figured I ought to learn how to solve the ‘Cube. I’m not talking about speed solving, here, either, learning those skills are far beyond what I want to spend time on. I settled for learning the simpler algorithms that other people have devised, and memorized how to solve the basic 3x3x3 standard cube, as well as the 2x2x2, the “Megaminx” dodecahedron variant and a pesky little version called the Ghost Cube.

I’ve since collected a couple dozen of different iterations of the Cube, as well as some other oddments like a barrel and flower, collectively called “Twisty Puzzles” in some corners of the internet. They are a fascinating fusion of function and fun, experiments with spatial and tactile troubleshooting with strong visual appeal. The mechanical engineering on display is almost as fascinating as the puzzles themselves.

Speaking of engineering, take a look at Oskar van Deventer‘s work. Some of his puzzles look amazing, and more impressively, function in weird and boggling ways. There’s a whole world of puzzles out there, and I’m slowly collecting some here and there to keep my brain and fingers nimble.

I’ve also recently taken a simple shape-shifter version of the ‘Cube and inflicted a bit of graffiti on it. I call it the OCD Mondrian Cube for now, though it’s more colorful than a proper Mondrian painting, almost more like a stained glass sort of thing, as my eldest noted. Proper Product Name Pending, and so on, etc.

It has two “solve states”, but it’s more precise to say that those two solved states are each “half-solved”. You can either make it into a nice, smooth cube (scrambling the colors), or you can group the colors in the six cardinal directions (scrambling the shape). You cannot solve for the shape and the colors at the same time. It will either drive your OCD mad or overload it and help you relax, maybe even allowing you to just play with the thing and find a completely unsolved state that you can find beauty in. I’m not sure how it would actually work with someone vexed with such a psychological condition, so it may be more trouble than it’s worth for some people, to be sure. Even so, I’m fond of the thing, and I’ve half a mind to see about getting it made more officially than this permanent-marker version I’ve prototyped.

Puzzles are good for the brain, I think. There’s value in learning methodical approaches to problem solving, and I see some extra value in this half-solvable mutant I’ve cobbled together. Sometimes life simply doesn’t have simple solutions. You can optimize for one thing, but you have to let something else go. I believe it’s a valuable life lesson to learn that sometimes solving things doesn’t mean they are then perfect. Sometimes “good enough” truly is enough, and while we’re commanded to “be perfect” in holy writ, that’s only something we can do with divine help. Sometimes all we can do is make life a little bit better, or simply find joy in the journey.

I introduced the Scarbots a bit last time, and have since produced a couple more of them. I’ll save today’s for next time, but these two get to join their brethren to finish up Week One of Inktober 2021. I had a little more time on these, so I managed to finish up the inkwork. I do clean them up a bit before coloring them, so that’ll wait, but for now, that’s 7 new Scarbots in the sketchbook for the year!

Inktober is an annual art project, intended to get people in the habit of drawing a bit with ink every day. I’ve never really had time to fully commit to such a thing, but I’ve been trying to do a bit of ink drawing each day this October. I’ve only “finished” one of these, and I suspect I’ll go back and do more with each of them at some point, like I did with this, the first Scarbot I ever produced (there’s another over on my Artstation page):

The Scarbots are a remnant of a forgotten war in an alternate Earth history’s northern Europe. They are part of the Project Khopesh storyline that I work on when I can make the time. They are expert scavengers, repairing themselves and each other as often as they need in the Northscar badlands. No two are the same, and though they are expert mechanics and very skilled in improvisation, they aren’t all that intelligent outside of their mission expertise and maintenance.

This new batch of Scarbots are certainly rougher, but these are the raw scans, straight from my sketchbook. I did some pencil work first, then inked in with a simple Uni-ball Onyx Micro ballpoint pen. If nothing else, I’ll have a new herd of Scarbots to play with at the end of the month. It will be fun to “flesh” these out, as it were, one of these days.

Thanks for stopping by, and we’ll see what else I can come up with!

I was recruited to produce an adventure for my local library’s teenage D&D event that will be running tomorrow, and while it’s taken more time than I thought, I’ve had the opportunity to learn to use a half dozen new pieces of software and brush up a bit on my writing, editing, sketching, painting and cartography.  Some of the need to learn new tricks is due to the midstream switch to using the Roll20 website for remote play instead of just meeting at the library in person.  I like learning new things and finding ways to make old tools do new things, so this has been a good experience.  It does wind up taking longer than just using old, mastered tools, but I like to think that the ability to learn new things is a healthy one, even if it hasn’t led to more employment opportunities.

This “module” of sorts is offered as a free download.  It was done for the Orem Public Library, using some of my own art, a bit from my daughter, and free assets from other sites, noted in the text.  It’s designed as a toolkit; a setting, maps, an adventure, a handful of monsters and some NPC “seeds” to spur adventures.  You can play through the adventure or just noodle around in some of the maps, fighting monsters.  It’s an introductory sort of thing, meant to engage teens who may never have played an RPG before.  I haven’t yet produced the “printer friendly” version of the file, since making the Roll20-ready assets was the priority, but I’ll see about getting those optimized monochrome assets done in the next week or so, time allowing.

If you do poke around in these files, I’d welcome feedback of any sort.  I believe it will serve its stated purpose, even as I admit that I’m new to the 5th Edition of D&D, as well as the production software, so this isn’t going to be as polished as some of those glossy minibooks that the Pathfinder or D&D people produce.  I may also note that I’m not attached to any particular RPG, and this production was meant to be flexible; it could be tweaked fairly easily for use in other systems.

Please feel free to download these files and reproduce them for personal or nonprofit use.  Tangentially, I also modeled a sculpture of the “Gyro Golem” for use on the library’s 3D printers, but that sort of fell by the wayside.  It’s also available as a free download on Thingiverse or Pinshape.

GyroGolemRenderCropped

Thank you, and hopefully these are of some use to you!

LibraryOfTheLost2020

(Link above is to the master PDF, the following are supplemental images for Roll20 usage)


Roll20Prep


I’ve been meaning to recycle this article for a while, and I had a few minutes to work on it lately.  It’s more or less a copy/paste of an art tutorial I wrote up for the player forums for YoHoHo Puzzle Pirates!, a game that I still think well of, even if it’s in its sunset years.

I tend to sketch with ballpoint pens, and paint in Photoshop.  This tutorial covers taking what I think of as a rough sketch, and turning it into a 150×150 pixel “avatar”, but some of the techniques work elsewhere.  I do seem to be missing some of the original art, sadly, but the original article is still up on the YPP! forums over here:

Silveransom’s Avatar Tech

For a “Reader’s Digest Condensed Version”, please continue, and as always, I’m happy to answer questions.  I’ve added a few asides here and there, always in italics.

=====================================================

It’s come up a few times, and I’ve wanted to do a Photoshop tutorial since before my YPP days, so here’s a whirlwind tour of my methodology of avatar art. It’s actually a bit generalized, but this is how I wind up doing most of my avatar art.

1. Draw something cool in my sketchbook. I do this with a ballpoint pen, most of the time. It’s personal preference… as is the definition of “cool”. This particular monkey is actually a component of an avatar I did for Phillite. He works as a standalone critter, though, so I’m reusing him for this project. (Which also means that, as might be expected, I ask that the art in this thread not be used elsewhere.)

2. Scan it in to Photoshop, usually at 600 dpi. This gives me room to play with effects. I usually shrink it down once it’s all painted the way I like it, but I like working big. It gives me more freedom to try big, sweeping brushstrokes, and more precision in tweaking. I bought a cheap Memorex scanner on sale for $40 years ago, and it’s been fantastic.
By the way, if you’re serious about computer art, do yourself a favor and get a tablet. Wacom Bamboo tablets are a great entry level product. The software doesn’t matter all that much, since paint.net, GIMP and ArtRage are free and will suffice (Clip Studio Paint and Affinity work as fairly low cost powerful single-purchase alternatives as well), and some tablets come with software. I use Photoshop Elements 2 because it’s what I have handy. I also use Painter on occasion, but that’s an indulgence. The tablet, though… that’s almost essential.

MonkeyTutorial01

3. Use Photoshop’s Levels modifier to clean up the sketch. I make a duplicate of the scanned layer, just in case I need the original for some reason, and apply Levels (Ctrl-L) to the duplicate. Pulling in both end knots a wee bit cleans up most of the static that came from the scan.

MonkeyTutorial02

4. Since my sketches tend to be a little rough, I need to do some Rubber Stamp surgery to clean up a bit. The Rubber Stamp tool takes data from a source part of the image, and replicates it elsewhere. You Alt-click to define the source, and then “paint” the duplicate, winding up with this sort of effect, here duplicating the alternate arm’s thumb:

MonkeyTutorial03

5. Rubber Stamp to clean the drawing, like this, cloning in the blank paper/background into the areas that should be clean on the drawing… it may take a bit of work and several clone source points, chosen each time with the Alt-Click:

MonkeyTutorial04

6. I then make a new level (on which I’ll be painting), and move the clean sketch to the top of the stack, and set the level blending type to Multiply. This lets me treat it as an outline, and paint the color in underneath.

MonkeyTutorial05

7. Start painting on a layer underneath the drawing. I don’t paint on the drawing layer. All coloring takes place on layers between the drawing and the white background layer I’ve set up. This gives me the ability to tweak the painting independent of the background and the sketch. This use of layers is one of the huge strengths of Photoshop (or any program that uses layers), and why working digitally can be a very different animal from traditional art.

MonkeyTutorial06

8. The base color for the monkey is in, carefully covering his space. Now, it’s time for another layer for the shadowing.

MonkeyTutorial07

9. The shadow layer is just a bit of paint that’s darker than the base color. It’s painted in a bit roughly at first…

MonkeyTutorial08

10. Then the Gaussian Blur filter gets applied, to soften it up (I usually do this, as illustrated, on a copy of the shadow painting layer, just in case I need to go back a step and tweak it):

MonkeyTutorial09

11. This makes for a nice rounding effect, and even gives a nice “reflected lighting” subtlety to the larger areas, like the monkey’s torso. (The dark side of most objects in real space is tempered a bit by reflected light, which this neatly simulates.)

MonkeyTutorial11


12. The Gaussian Blur pretty much obliterates the subtle shadows in the hair, so I make a new layer, and start painting in new, detailed shadows. These are brushstrokes, like the main shadow layer, but I don’t use the Gaussian Blur on these. I just use the Smudge tool to push things around the way I like them. Here’s a close shot on the hair in progress:

MonkeyTutorial10

and the tail:

MonkeyTutorial12

and I sharpen up the cast shadow under the chin with a few additive strokes:

MonkeyTutorial13

13. Erase around the edges of both shadow layers. It’s a subtle thing, but this shows how the Gaussian Blur pushed the color out of the outlines. I prefer to keep things clean, so I erase the blurred bit.  Of further note, looking at this from 2019, this edge cleanup can also be accomplished by putting all of the color layers into a layer group, and adding a layer mask to that group that simply masks off anything not inside of where you want colors.  This lets you create the edge cleanup for all of the color layers with a single operation, which is a great update to the workflow.  Photoshop Elements 2 had neither layer masks nor layer groups, so this is a bare-bones tutorial.  The fuller releases of Photoshop give more tools to work with, including “Smart Objects”, which I’ll revisit in a different tutorial.

MonkeyTutorial14

14. Now for a highlight layer. I do this the same way I did the shadow layer, just with a different color, and from a different direction. In other words, paint,

MonkeyTutorial15

blur,

MonkeyTutorial16

and make a secondary highlight layer for detail work, then erase around the edges to be clean:

MonkeyTutorial17

15. Since monkeys in YPP have a two tone look to them, with the belly, feet, hands and face a different color, I make a new layer to try to get this effect.

MonkeyTutorial18

16. Paint the relevant parts in a lighter color, then change the layer Blending options to get the desired effect. I settled on Soft Light. This allows me to paint in a second color tone, without losing the shading and hair effects I’ve made so far.  I’m using a subtle secondary tone here, and you can do more with color shifting by using a different paint color and layer compositing effects like Hue (instead of Soft Light) that shifts the color underneath while maintaining the shading:

MonkeyTutorial19

MonkeyTutorial20

17. Close to being done, it’s time for little tuning. I decided that the monkey’s belly needed a bit more dimension, so I added a bit to the shadows:

MonkeyTutorial21

18. Finish by painting the sword on a few new layers, using similar effects for shading:

MonkeyTutorial22

Add a layer for his eyes and nose…
aaand he’s done!

MonkeyTutorial23

Since this was done at 600 dpi, it’s not really ready for an avatar. It comes out to be this big, useful for seeing detail:

Monkey2Huge


After rescaling the resolution, a middle sized version looks like this:

Monkey2Med

And the avatar might look like this:

Monkey2Avvie

It loses a lot of detail at that scale, so this methodology isn’t always appropriate. It’s how I work because I like to have my art around at high resolution if I need it for my portfolio, especially if I need to print it out. Working high and reducing as necessary winds up looking a lot better than working small and magnifying it if necessary.

I would also usually go back and flatten some layers, erase the edges, throw in a background and/or a border… but that’s about it.

Thanks for stopping by! I’m happy to answer any questions.

-Silver

Hello everyone!

TinkerTrainBitsSplashBlueTrouble

Yes, it’s been far too long since I’ve posted here, but that’s just how life goes sometimes.  This time, as last time, it’s to announce a new Kickstarter campaign we’re running, this time for some steampunk train-themed tabletop game bits.

Trouble on the Tracks: Tinker Bits IV

There are a bunch of photos of the prototypes over here, too:

Project Khopesh on Pinterest, Tinker Train Bits

Please spread the word!  Promotional algorithms on social media sites aren’t kind to self-promotion, and many forums outright forbid it.  It’s hobbling crowdfunding a bit, and we greatly appreciate any boosted signal that you can offer, even if you don’t want to jump into the project yourself.

Thank you all!

Tesh

…and yes, there are still some “Steam backlog” mini reviews in the pipeline, I just need to make time to polish things up a bit.

OK, we’re live!  Thank you all for stopping by and checking out the preview last time, and please spread the word on this project!  We’re looking forward to getting the dragons made, especially, but all 4 designs are fun additions to the Tinker line of goodies.

ScourgeOfTheSkiesSplashB

ScourgeOfTheSkiesSplashB